Category: Development

  • D365/X++ NinjaDevTools to Development Add-In

    Background

    Back in December 2017, Hichem Chekebkeb released NinjaDevTools on GitHub as a way to simplify D365 X++ development tasks. NinjaDevTools is a set of utilities that helps technical resources perform tasks that usually take multiple clicks on a single click. Out of the various utilities within NInjaDevTools, the ones I like the most (up to this day) are the Form Scaffolding and Menu Item Creation tools.

    I like the project so much that I have upgraded it throughout the years on my computer, even though I have zero knowledge of C# 😊 upgrading from Visual Studio 2017 to 2019 was a bit of an endeavour for me, but, I managed to complete it and got the project to work.

    Nowadays, we use Visual Studio 2022 for D365 X++ development, and from an architectural perspective, it is a different beast. Some of the .net libraries were changed or deprecated and for this reason, the update was not working, the same update path I followed between VS2017 and VS2019 got me nowhere.

    After many tries, I finally got the project to build a DLL, however, the extension never loaded when added to the D365 Add-In extensions folder and I just gave up.  


    The Breakthrough

    After a whole lot of disappointment, I researched a bit more about the subject. I discovered that in Visual Studio 2022, some framework classes used for design and context manipulation were changed or deprecated. At the same time, I found out about the development add-ins for D365. The add-in project has been there for a while, but now I found myself at a crossroads with the upgrade. Should I continue trying to upgrade it? Or, should I try something else? That’s the moment it hit me, I can use a development add-in to implement the utilities I want.

    My original idea was to update the NinjaDevTools solution to continue having an all-in-one utility tool. However, with the multiple setbacks, and the framework changes I decided to extract the tools I liked from the original solution to create a couple of D365 Development Add-ins.

    The form scaffolding utility populates the form with all the required pattern controls, or at least the vast majority. The menu item creation utility’s purpose is self-explanatory, but it creates a menu item and inserts it into the current working project. In this article, I will showcase the creation of the form scaffolding add-in.

    Please be aware that the form pattern creation is not dynamic, Hichem spent some time creating the form pattern controls through code, meaning, if you want to include more functionality to the add-in you can add the controls manually to your add-in’s code so you can use it on your development workflow later on.


    Add-In Creation

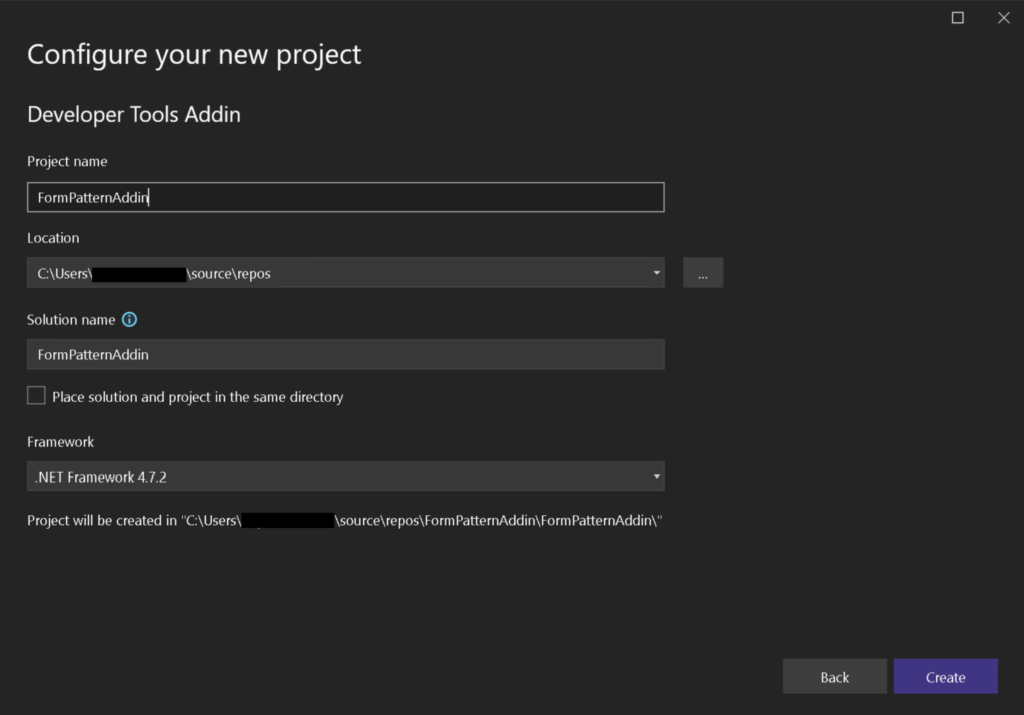
    1. Select the Developer Tools Addin project when creating a new project on Visual Studio 2022:
    1. Specify the details of your add-in project and click on Create.
    1. The solution will contain the items presented in the screenshot below.
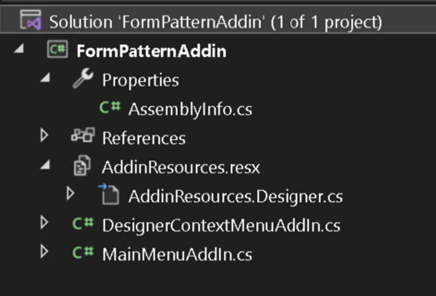
    1. Out of the list above, the only items we should care about are:
      • DesignerContextMenuAddin.cs: work on this file if your add-in is intended to work during design time, meaning, if you have the designer open and want to execute an action during design.
      • MainMenuAddIn.cs: use this file if your add-in is located at the Main Menu > Extensions > Dynamics 365 > Addins and its objective is to perform tasks that are more of a generic nature.
      • AddinResources.resx: this file will allow us to set the labels for the designer context and the main menu buttons.
    2. In this article, we will implement the form scaffolding from NinjaDevTools while on the designer. For that reason, we will use the DesignerContextMenuAddin.cs file.
    3. This is how the file looks at the beginning. If you notice the file contains a lot of information about how to use it:
    using Microsoft.Dynamics.AX.Metadata.Core;
    using Microsoft.Dynamics.Framework.Tools.Extensibility;
    using Microsoft.Dynamics.Framework.Tools.MetaModel.Automation;
    using Microsoft.Dynamics.Framework.Tools.MetaModel.Automation.Forms;
    using Microsoft.Dynamics.Framework.Tools.MetaModel.Automation.Tables;
    using Microsoft.Dynamics.Framework.Tools.MetaModel.Core;
    using System;
    using System.ComponentModel.Composition;
    using System.Linq;
    
    namespace FormPatternAddin
    {
        /// <summary>
        /// TODO: Say a few words about what your AddIn is going to do
        /// </summary>
        [Export(typeof(IDesignerMenu))]
        // TODO: This addin will show when user right clicks on a form root node or table root node. 
        // If you need to specify any other element, change this AutomationNodeType value.
        // You can specify multiple DesignerMenuExportMetadata attributes to meet your needs
        [DesignerMenuExportMetadata(AutomationNodeType = typeof(IForm))]
        [DesignerMenuExportMetadata(AutomationNodeType = typeof(ITable))]
        public class DesignerContextMenuAddIn : DesignerMenuBase
        {
            #region Member variables
            private const string addinName = "DesignerFormPatternAddin";
            #endregion
    
            #region Properties
            /// <summary>
            /// Caption for the menu item. This is what users would see in the menu.
            /// </summary>
            public override string Caption
            {
                get
                {
                    return AddinResources.DesignerAddinCaption;
                }
            }
    
            /// <summary>
            /// Unique name of the add-in
            /// </summary>
            public override string Name
            {
                get
                {
                    return DesignerContextMenuAddIn.addinName;
                }
            }
            #endregion
    
            #region Callbacks
            /// <summary>
            /// Called when user clicks on the add-in menu
            /// </summary>
            /// <param name="e">The context of the VS tools and metadata</param>
            public override void OnClick(AddinDesignerEventArgs e)
            {
                try
                {
                    // TODO: Do your magic for your add-in
                }
                catch (Exception ex)
                {
                    CoreUtility.HandleExceptionWithErrorMessage(ex);
                }
            }
            #endregion
        }
    }
    
    Code language: C# (cs)
    1. Resolve the TODO comments and remove the ITable metadata attribute from the class as we will implement this add-in only for forms.
    2. The onClick() method is the most important method in this file. This file is where the form control population will be implemented.

      For this article, I will implement the DetailsMaster form pattern, but you can create and add the SimpleList and SimpleListDetails patterns which are available at Hichem’s NinjaDevTools project on GitHub (https://github.com/HichemDax/D365FONinjaDevTools/blob/master/D365FONinjaDevTools/ScaffoldFormPattern/ScaffoldFormPattern.cs)
    using Microsoft.Dynamics.AX.Metadata.Core;
    using Microsoft.Dynamics.Framework.Tools.Extensibility;
    using Microsoft.Dynamics.Framework.Tools.MetaModel.Automation;
    using Microsoft.Dynamics.Framework.Tools.MetaModel.Automation.Forms;
    using Microsoft.Dynamics.Framework.Tools.MetaModel.Automation.Tables;
    using Microsoft.Dynamics.Framework.Tools.MetaModel.Core;
    using System;
    using System.ComponentModel.Composition;
    using System.Linq;
    
    namespace FormPatternAddin
    {
        /// <summary>
        /// This add-in allows to implement form pattern control auto-population
        /// </summary>
        [Export(typeof(IDesignerMenu))]
        [DesignerMenuExportMetadata(AutomationNodeType = typeof(IForm))]
        public class DesignerContextMenuAddIn : DesignerMenuBase
        {
            #region Member variables
            private const string addinName = "DesignerFormPatternAddin";
            #endregion
    
            #region Properties
            /// <summary>
            /// Caption for the menu item. This is what users would see in the menu.
            /// </summary>
            public override string Caption
            {
                get
                {
                    return AddinResources.DesignerAddinCaption;
                }
            }
    
            /// <summary>
            /// Unique name of the add-in
            /// </summary>
            public override string Name
            {
                get
                {
                    return DesignerContextMenuAddIn.addinName;
                }
            }
            #endregion
    
            #region Callbacks
            /// <summary>
            /// Called when user clicks on the add-in menu
            /// </summary>
            /// <param name="e">The context of the VS tools and metadata</param>
            public override void OnClick(AddinDesignerEventArgs e)
            {
                try
                {
                    var metaModelProviders = CoreUtility.ServiceProvider.GetService(typeof(IMetaModelProviders)) as IMetaModelProviders;
                    var metaModelService = metaModelProviders.CurrentMetaModelService;
    
    
                    var form = (IForm)e.SelectedElement;
                    var axForm = (AxForm)form.GetMetadataType();
    
    
                    switch (axForm.Design.Pattern)
                    {
                        case "DetailsMaster":
                            //<Main>
                            axForm.Design.AddControl(new AxFormActionPaneControl { Name = "MainActionPane" });
                            var myNavigationListGroup = new AxFormGroupControl { Name = "NavigationListGroup" };
    
                            // <NavigationListGroup>
                            myNavigationListGroup.AddControl(new AxFormControl
                            {
                                Name = "NavListQuickFilter",
                                FormControlExtension = new AxFormControlExtension { Name = "QuickFilterControl" }
                            });
    
                            myNavigationListGroup.AddControl(new AxFormGridControl { Name = "MainGrid" });
                            // </NavigationListGroup>
    
                            axForm.Design.AddControl(myNavigationListGroup);
                            var myPanelTab = new AxFormTabControl { Name = "PanelTab" };
    
                            var gridPanel = new AxFormTabPageControl { Name = "GridPanel" };
                            gridPanel.AddControl(GetFilterGroup("DetailsFilterGroup", "DetailsQuickFilter"));
                            gridPanel.AddControl(new AxFormGridControl { Name = "DetailsGrid" });
                            gridPanel.AddControl(new AxFormCommandButtonControl { Name = "DetailsButtonCommand" });
    
                            var detailsPanel = new AxFormTabPageControl { Name = "DetailsPanel" };
    
                            var titleGroup = new AxFormGroupControl { Name = "TitleGroup" };
                            titleGroup.AddControl(new AxFormStringControl { Name = "HeaderTitle" });
    
                            detailsPanel.AddControl(titleGroup);
    
                            var detailsPanelTab = new AxFormTabControl { Name = "DetailsTab" };
                            detailsPanelTab.AddControl(new AxFormTabPageControl { Name = "DetailsTabPage" });
                            detailsPanel.AddControl(detailsPanelTab);
    
                            myPanelTab.AddControl(detailsPanel);
                            myPanelTab.AddControl(gridPanel);
                            axForm.Design.AddControl(myPanelTab);
                            //</Main>
                            break;
                    }
    
                    var model =
                        DesignMetaModelService.Instance.CurrentMetadataProvider.Forms.GetModelInfo(axForm.Name)
                            .FirstOrDefault();
    
                    metaModelService.UpdateForm(axForm, new ModelSaveInfo(model));
                }
                catch (Exception ex)
                {
                    CoreUtility.HandleExceptionWithErrorMessage(ex);
                }
            }
    
            private static AxFormGroupControl GetFilterGroup(string filterGroup = "FilterGroup",
                string quickFilter = "QuickFilter")
            {
                var filterGrp = new AxFormGroupControl
                {
                    Name = filterGroup,
                    Pattern = "CustomAndQuickFilters"
                };
                filterGrp.AddControl(new AxFormControl
                {
                    Name = quickFilter,
                    FormControlExtension = new AxFormControlExtension { Name = "QuickFilterControl" }
                });
                return filterGrp;
            }
    
            #endregion
        }
    }
    
    Code language: C# (cs)
    1. Now build the solution. Then, go to your solution folder using File Explorer look for the bin/Debug folder and copy the DLL into the addin extensions folder of the Visual Studio D365 extension.

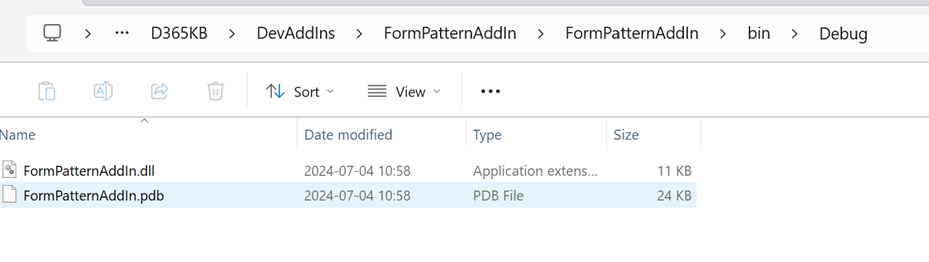
    Tip: to know where your D365 extension is located I usually open the code snippet manager on Tools > Code snippet manager > Select X++ as the language and select the Snippets folder (not the User snippets) copy the path and then paste it on a file explorer window.

    1. Restart Visual Studio and enjoy your newly created Development Add-in 😊.
    2. Create a new form, then when the designer opens, right-click on the form name > Addins > and look for the name you gave to your form scaffolding add-in 😊
    3. Enjoy!!!

    Conclusion

    Thanks to projects like NinjaDevTools our X++ development day-to-day work gets a bit easier. Visual Studio 2022 brought some changes, and I did not want to lose the utilities I had used for almost 7 years.

    You can also use Hichem’s project to create your own development add-ins and simplify your work at the same time.


    Thanks for checking up and happy coding😊

  • D365/X++ Chain of Command

    Back in 2018 I wrote this article regarding the new capabilities in Chain of Command (CoC) to support Form extensibility which at that point was solely handled by Event Handlers. Fast forward six and a half years and as of December 2024, Chain of Command is the go-to method recommended by Microsoft to extend your application.

    Like six years ago, Microsoft supports the implementation of CoC in Classes, Tables, Data Entities, and Forms. However, some things regarding how I work with extensibility on Forms have changed.

    In this article I just want to focus on Forms and its set of nested classes, as there is an abundance on all other topics, but mostly I just want to share how I usually work when extending a standard form.


    Considerations

    Before we dive into some examples of CoC, remember that in order to use CoC you must declare your class as final, and your methods should always contain the next keyword.

    The next keyword behaves like a super, and it will define when your extended logic executes. Code written before the next line behaves like a pre-event, your logic executes first, and later on, the logic residing in the standard method gets executed. Code written after the next line behaves like a post-event, your logic executes after the standard code has been executed.

    Currently there is no support in the Visual Studio X++ Editor to discover the method candidates that can be wrapped, so you need to refer to the system documentation for each nested concept to identify the proper method to wrap and its exact signature.

    Internal or private methods are not wrappable with the exception of private methods containing the decorator [wrappable(true)].


    Decorators

    These are the decorators we will use when extending a form object:

    
    // Extends a form
    [ExtensionOf(formStr(<NameOfFormBeingExtended>))] 
    
    // Extends a form data source
    [ExtensionOf(formDataSourceStr(<NameOfStdForm>, <NameOfDS>))] 
    
    // Extends a form data field
    [ExtensionOf(formDataFieldStr(<NameOfStdForm>, <NameOfDS>, <NameOfDataField>))] 
    
    // Extends a form control part of the design
    [ExtensionOf(formControlStr(<NameOfStdForm>, <NameOfUIControl>))] 
    
    Code language: C# (cs)

    Base Form Structure

    [Form]
    public class CATTestForm extends FormRun
    {
        [DataSource]
        class CustGroup
        {
            
            public void initValue()
            {
                super();
                 
                custGroup.PaymTermId = 'Net10';
                info(strFmt ("Pre CoC: $1 set to $2", 
                    fieldId2PName(tableNum(CustGroup), fieldNum(CustGroup, PaymTermId)),
                    custGroup. PaymTermId));
            }
        }
        
        [DataField]
        class CustGroup
        {
            public void modified()
            {
                super() ;
    
                CustGroup.Name = 'TEST';
                warning(strFmt("Pre CoC: $1 set to $2", 
                    fieldId2PName(tableNum (CustGroup), fieldNum(CustGroup, Name)),
                    custGroup.Name));
            }
        }
        
        [Control ("Button")]
        class ExecuteButton
        {
            public void clicked()
            {
                super();
            }       
        }
    }
    Code language: C# (cs)

    Looking at the code above, we can be certain that forms in D365 are a set of nested classes. We can see a class for a data source, a class for a data source field, a class for a button control, etc…


    Base Form Behaviour

    Based on our base form code structure, this is what happens without leveraging CoC.

    • Creating a new record automatically invokes the initValue() method at data source CustGroup, setting the Terms of payment to Net10
    • Entering the Customer group will trigger the modified() method, which will set the Description to TEST
    • When the Execute button is clicked, no action is performed as the clicked() method is just calling super.

    Implementation

    To use CoC within the classes of the Form, you will need to create a class for every single object you want to extend. This can be a little cumbersome at the beginning, but once you get used to it, the process becomes easier. Likewise, the new development toolkit in Visual Studio 2022 allows you to extend these controls directly from the Application Explorer window.

    Let’s take a look at the following three classes that will demonstrate how CoC works on data sources, data source fields, and controls:

    • Form extension class:
    /// <summary>
    /// Extension class for form <c>CATChainOfCommand</c>
    /// </summary>
    [ExtensionOf(formStr(CATChainOfCommand))]
    final class CATChainOfCommandForm_CAT_Extension
    {
        /// <summary>
        /// Executes logic to present an error after a button is pressed
        /// </summary>
        public void execute()
        {
            error("After CoC: Operation executed through CoC");
        }
    }
    Code language: C# (cs)
    • DataSource extension class:
    /// <summary>
    /// Extension class for form datasource <c>CATChainOfCommand, CustGroup</c>
    /// </summary>
    [ExtensionOf(formDataSourceStr(CATChainOfCommand, CustGroup))]
    final class CATChainOfCommandForm_CustGroupDS_CAT_Extension
    {
        /// <summary>
        /// Initializes the values of a newly created record
        /// </summary>
        public void initValue()
        {
            CustGroup custGroup = this.cursor();
    
            next initValue();
    
            custGroup.PaymTermId = 'Net30';
    
            info(strFmt("Post CoC: %1 set to %2", 
                fieldId2PName (tableNum(CustGroup) , 
                fieldNum(CustGroup, PaymTermId)), custGroup.PaymTermId));
        }
    }
    Code language: C# (cs)
    • DataSource field extension class:
    /// <summary>
    /// Extension class for form datasource field <c>CATChainOfCommand, CustGroup, CustGroup</c>
    /// </summary>
    [ExtensionOf(formDataFieldStr(CATChainOfCommand, CustGroup, CustGroup))]
    final class CATChainOfCommandForm_CustGroupDS_CustGroup_CAT_Extension
    {
        /// <summary>
        /// Performs operations when the data field is modified
        /// </summary>
        public void modified()
        {
            CustGroup       custGroup;
            FormDataSource  ds;
            FormDataObject  df = any2Object(this) as FormDataObject;
    
            next modified () ;
    
            ds = df.datasource();
            custGroup = ds.cursor ();
            custGroup.Name = strFmt("%1 with added description after CoC", CustGroup.Name);
        }
    }
    
    Code language: C# (cs)
    • Button control extension class:
    /// <summary>
    /// Extension class for form control <c>CATChainOfCommand, ExecuteButton</c>
    /// </summary>
    [ExtensionOf(formControlStr(CATChainOfCommand, ExecuteButton))]
    final class CATChainOfCommandForm_ExecuteButtonControl_CAT_Extension
    {
        /// <summary>
        /// Performs operations when a button is clicked
        /// </summary>
        public void clicked()
        {
            const str custGroup10 = '10';
            const str custGroup20 = '20';
    
            CustGroup           custGroup;
            FormButtonControl   bc = any2Object(this) as FormButtonControl;
            FormDataSource      ds = bc.formRun().dataSource(tableStr(CustGroup)) ;
    
            next clicked();
    
            custGroup = ds.cursor();
    
            if (custGroup.CustGroup == custGroup10 || custGroup.CustGroup == custGroup20)
            {
                element.execute() ;
            }
        }
    }
    
    Code language: C# (cs)

    Results

    Once we test the form following the same steps as before, this is what we get as a result after Chain of Command gets implemented:

    • Create a new record invokes the initValue() method at data source CustGroup, setting the Terms of Payment to Net10. However, we are wrapping this method using CoC, which will behave as a post-event. Therefore, the extended method will set Net30 as the new Term of payment.
    • Entering the Customer group will trigger the modified() method, which will set the Description to TEST. However, the data source field method is wrapped using CoC with a post-event. This will result in a modification of the Description, which will be the assignment before the next() call, plus the text added by the strFmt() function, resulting in a new value equal to TEST with added description after CoC.
    • When the Execute button is clicked a post-event is triggered, if the customer group is equal to 10 or 20, then the logic will execute. In the case of this button, it will invoke a method called execute() that is located in the form extension class. This method will print a message saying “After CoC: Operation executed through CoC”.

    Things I’ve Learned These Years

    After working so many years with Chain of Command I started to switch things a bit, initially in every extension I would try to put my logic within the extended class, but when you have a form with multiple data sources and you want to perform conditional logic based on multiple tables, it becomes complicated due to the number of objects you might need to declare to access those objects within a data source field extension or a control extension.

    Take as an example the ExecuteButton extension class on our sample, I did it this way (almost similar to my original 2018 article) to explain my point. Today I will do this differently. First, I will extract all the code inside the clicked() method extension and leave the line element.execute().

    /// <summary>
    /// Extension class for form control <c>CATChainOfCommand, ExecuteButton</c>
    /// </summary>
    [ExtensionOf(formControlStr(CATChainOfCommand, ExecuteButton))]
    final class CATChainOfCommandForm_ExecuteButtonControl_CAT_Extension
    {
        /// <summary>
        /// Performs operations when a button is clicked
        /// </summary>
        public void clicked()
        {
            next clicked();
    
            element.execute() ;
        }
    }
    
    Code language: C# (cs)

    All the code from the clicked() method is now part of the execute() method of my form extension class. This is easier as I have direct access to all my data sources without the need to poke around elements until I can get them all. In this case, because my element is the FormRun itself, I have direct access to my data source table record CustGroup which makes things easier when trying to evaluate if a customer group is equal to one of my predefined groups (10 or 20). Finally, once everything is cleaned up this is how it looks.

    /// <summary>
    /// Extension class for form <c>CATChainOfCommand</c>
    /// </summary>
    [ExtensionOf(formStr(CATChainOfCommand))]
    final class CATChainOfCommandForm_CAT_Extension
    {
        public const str custGroup10 = '10';
        public const str custGroup20 = '20';
        
        /// <summary>
        /// Executes logic to present an error after a button is pressed
        /// </summary>
        public void execute()
        {
            if (custGroup.CustGroup == custGroup10 || custGroup.CustGroup == custGroup20)
            {
                error("After CoC: Operation executed through CoC");
            }        
        }
    }
    Code language: C# (cs)

    Thanks for checking up and happy coding 🙂